Timber Frame!

Once the basement floor was poured, the next step was having the timber frame put up in the basement.  The day after the floor was poured, Silas Treadway, our timber framer, brought most of the timbers for the basement frame and started the process of positioning and fitting them.  Having the telehandler on site was essential.

Tim helping attach a beam to the telehandler. This wonderful machine can turn on a dime, has a forklift (to which a chain can be attached, as here), on an extendable arm.
Tim helping attach a beam to the telehandler. This wonderful machine can turn on a dime, has a forklift (to which a chain can be attached, as here), and an extendable arm (which can extend much further than shown here).

Silas used the telehandler to bring timbers to the basement for the frame, and to help put some of them in place.  The wood is all from our lot; pine posts, hemlock beams, and ash braces. Over the winter Silas shaped the timbers and carefully cut and shaped the mortises and tenons for all the joints very precisely.

The beginning of the frame, in the
The beginning of the frame, in the “walk out” corner of the basement.

The engineer also recommended placing a steel plate under each post. Apparently, the majority of the force, even in a solid post, is on the outside edges. The steel plate spreads out the downward pressure over the whole area of the post.

IMG_7500
Here you can see the steel plate, as well as the locust wood shims underneath, used to get the post to exactly the correct height.
Since the frame is actually free-standing in the basement, Silas used many straps and come-alongs to hold it together, along with lots of measuring and adjusting to make sure it was plumb and square.
Tim helping to place part of a long beam, which is in two pieces with a
Tim helping to place part of a long beam, which is in two pieces with a “scarf joint” over the central post.
Silas fitting in a brace.
At the end of Saturday, July 11, this is what the basement looked like!
At the end of Saturday, July 11, this is what the basement looked like! Isn’t is beautiful!

I found the whole process of putting up the timber frame fascinating!

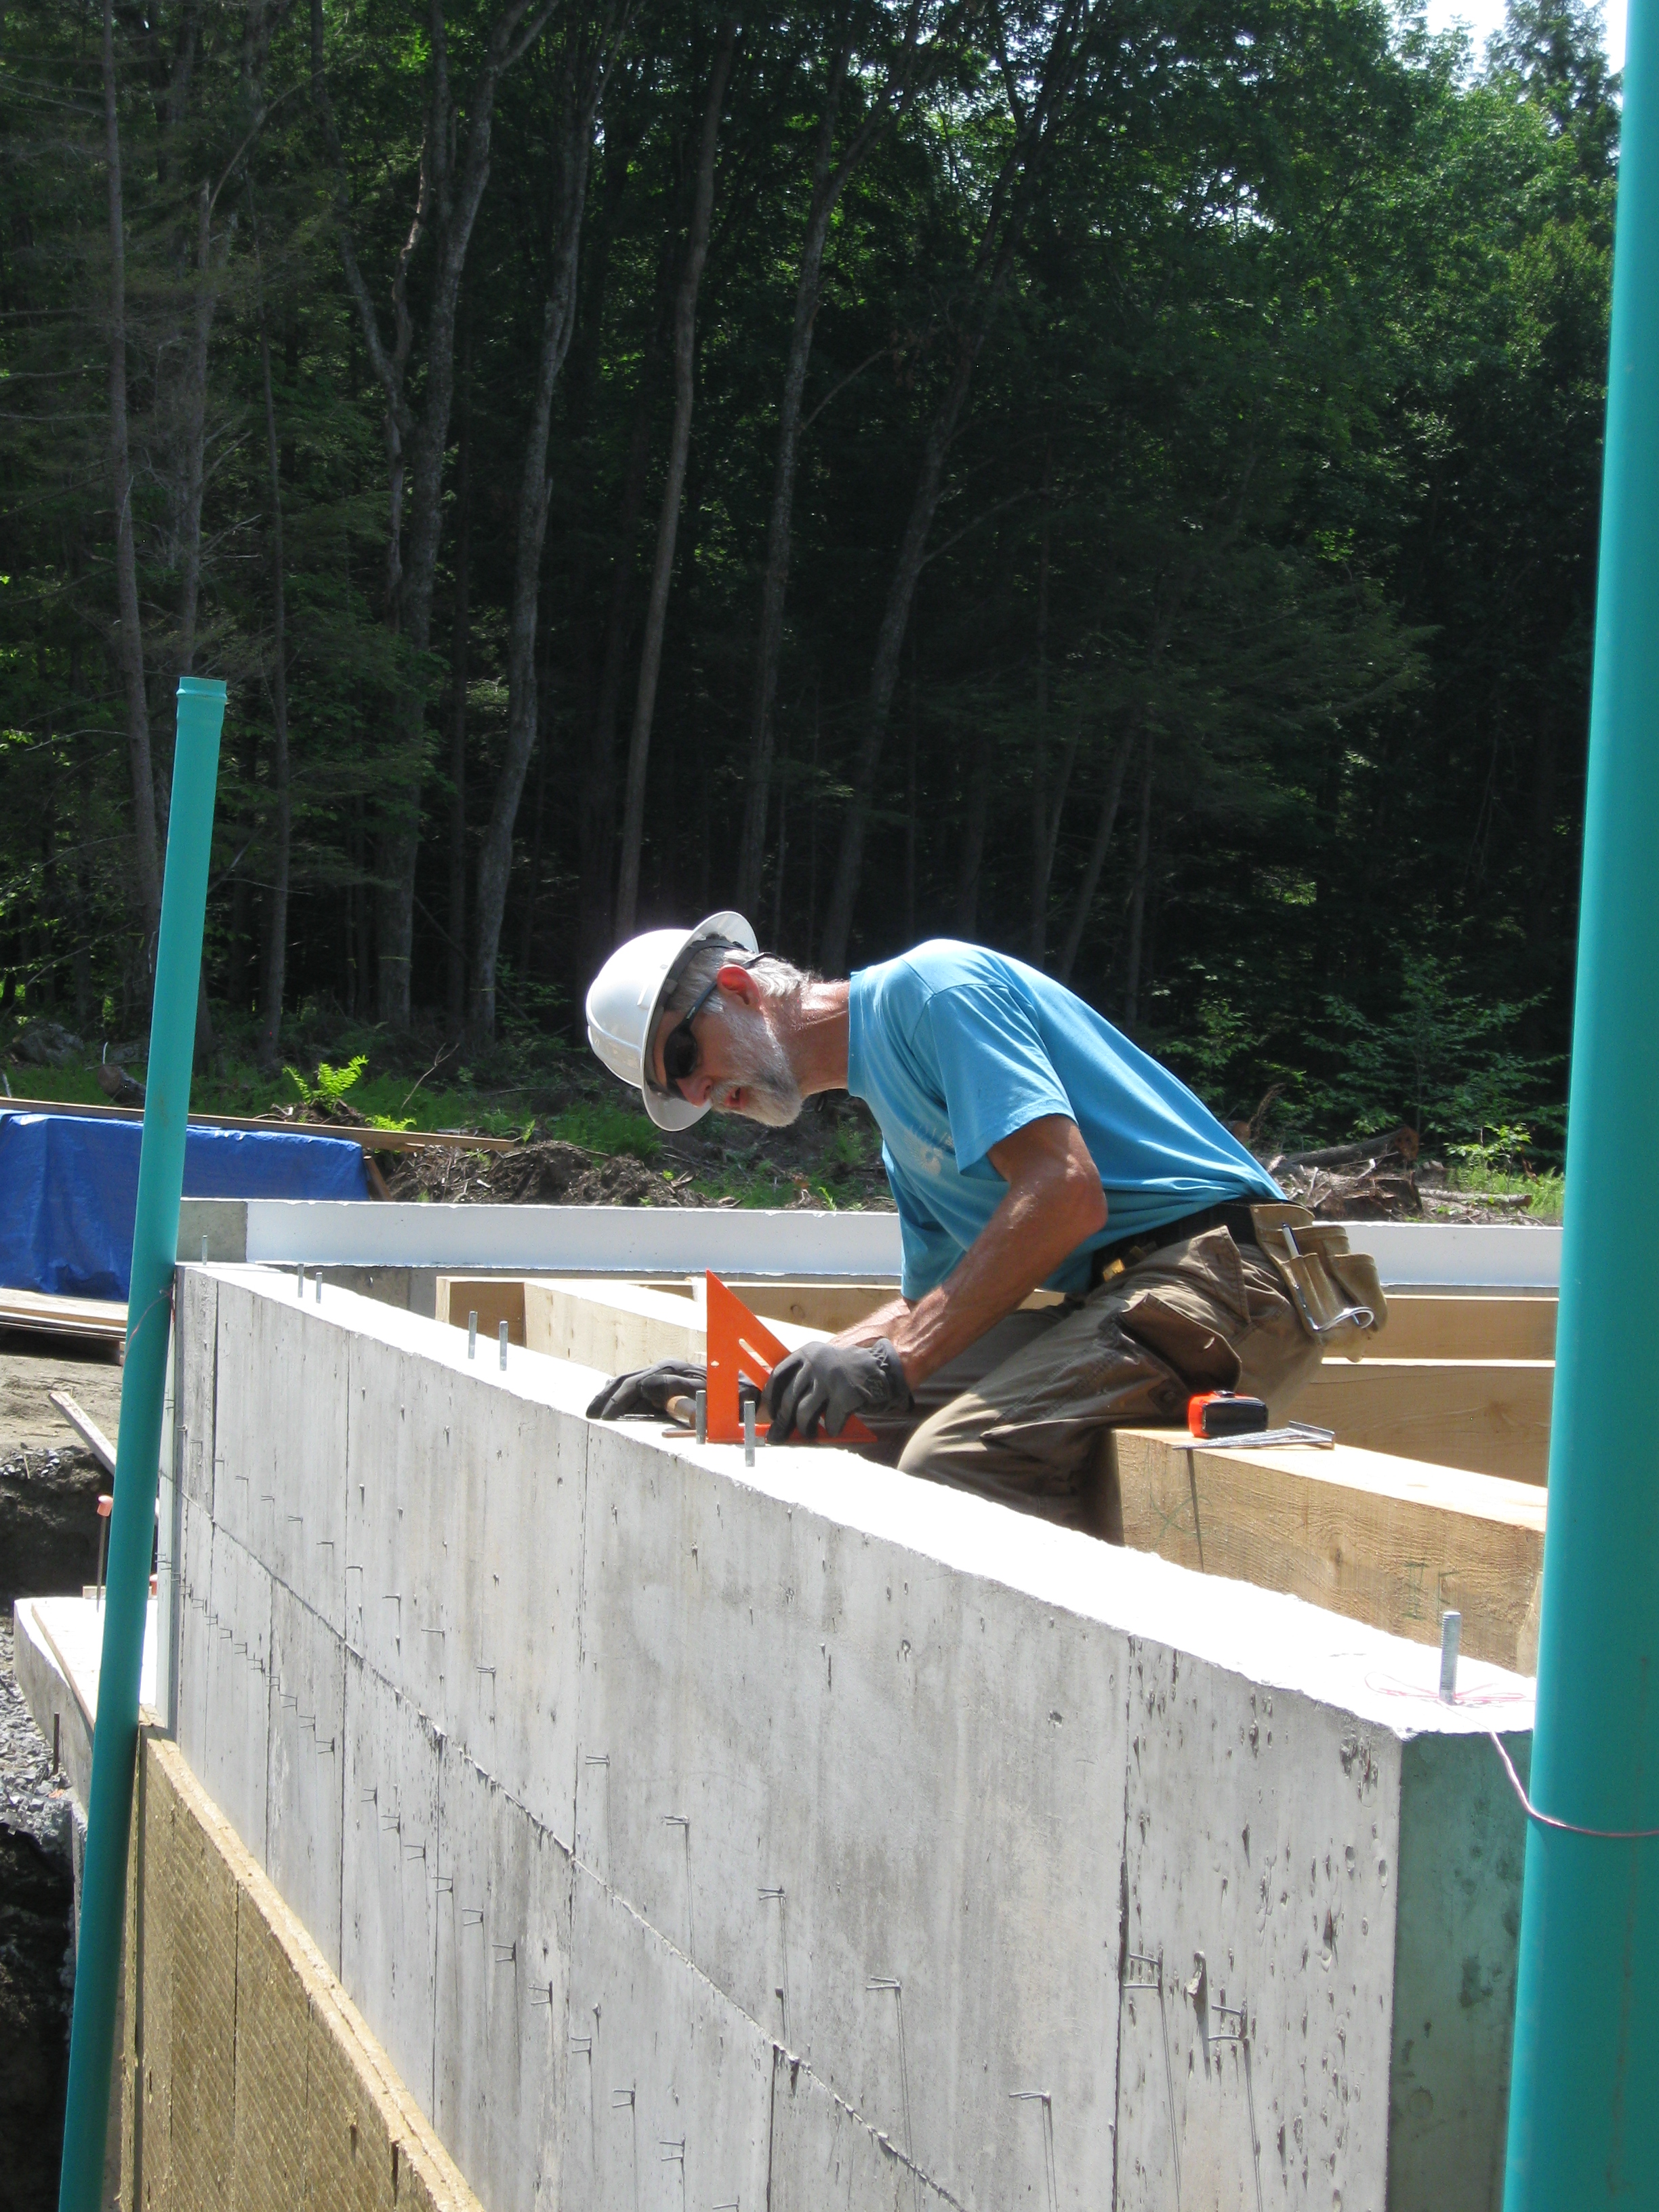
Before Silas could make the final adjustments of the frame, Tim and I had to put on the mudsill — a layer of wood that lies on top of the concrete wall.  It is really important to make sure this sill is square and level, so we spent alot of time measuring and figuring. The “missing corner” made the task challenging!  Tim had found a source for locust wood, which is very hard and rot resistant, so we did not have to use chemically treated wood. The concrete wall had bolts embedded in it, so we had to drill holes in the locust boards at just the right places. We stapled a special pliable rubber gasket onto the bottom of the sill boards before installing them.  Tim did all the high up work!

Measuring. Look carefully -- you can see the bolts sticking up.

Laying out the rubber gasket and stapling it on.
Attaching the mudsill.

Almost all of the mudsill was installed by the end of Monday, the 13th. The next day or so Silas continued fine-tuning the frame, and putting in all the wooden pegs. He could now nail boards from the timber frame to the mudsill to hold it steady.

Here Silas is trimming off the end of a peg (the whole frame is held together with wooden pegs), and you can see the two wedges (one from each side) that tighten up the scarf joint.
Here Silas is sawing off the end of a peg (the whole frame is held together with wooden pegs), and you can see the two wedges (one from each side) that tighten up the scarf joint.

Tim and I still had to make the mudsill and rim joist for the south wall, which was more complicated (and took MUCH more time than expected) due to the design and connection to the (eventual) concrete slab floor on the south side. Norm, our concrete contractor, came to saw the expansion grooves in the basement floor, and we were able to use his very good laser level, which helped us alot.

Our next task (we started July 17) was to construct the first floor deck — place and install all the joists, and nail on the Advantech panels for the floor. I’ll explain more in the next post!

The weather has been variable — some days cool and clear, some with hot sun, some cloudy and quite humid. Tim and I both have very tan arms, and at the end of the day a shower never before felt so good!

Day lilies continue to bloom, lots of Queen Anne’s Lace coming out, also black-eyed Susans. Best of all, the impossibly red bee balm!

Bee balm and day lilies in my little "garden" spot.
Bee balm and day lilies in my little “garden” spot.
Our little "meadow" of wildflowers.
Our little “meadow” of wildflowers.

Another piece of great news:  we will be able to stay in the house where we are living (with wi-fi and cell phone service!) as long as we want. We had thought we’d have to move out, and start camping out in our tent by the beginning of August, which would have made our lives much more complicated! So we are very happy!  Life is good!

We Have a Basement Floor!

This post will catch you up with what it took to prepare the basement floor for the concrete pour, during the first couple of weeks of July.  This was more involved and required more problem-solving on our part than we had anticipated!

While most of the gravel had been put in the basement (see previous post), there were still 3 footings for posts to be poured, as well as the footings for the south part of the house that will be slab on grade. Once the footings were done, Eric our excavator added more gravel to the basement to bring the level mostly up to the tops of the footings.

Before the concrete floor could be poured, we had a lot of preparation to do. The first step was to make sure the gravel was as level as possible. In the end, we moved about 6 tons! of gravel (around 65 partly full wheelbarrow loads) to bring is up to level.

I filled 5-gallon bucket half full, that Tim emptied into our wheel barrow.
I filled 5-gallon buckets half full, that Tim then emptied into our wheel barrow.
Tim wheeled the VERY HEAVY gravel to where we needed it, then used the compactor on it.
The compactor vibrates to make the gravel settle. This is important, since uncompacted gravel can subside later on and make your floor crack.

It took us around a day and half, and finally, we got the floor level! We were really tired!

The next step was to lay out 4″ thick slabs of extruded polystyrene (XPS) as insulation under the floor. While XPS is not exactly a “green” product, we were able to obtain reclaimed XPS (from buildings that were dismantled). When it comes to energy efficiency AND sustainable building, one is faced with having to make compromises one way or another.  Anyway, it was relatively easy to work with and lay out.

4
4″thick XPS panels. We had to cut out around each footing and fit around several pipes. The red pieces are tape.

However, the process was complicated by late arriving recommendations from an engineer. Because the posts will be supporting all of the upstairs AND the roof, there was concern about the point loads, especially with 4″ of XPS under the concrete. So the engineer recommended a thinner layer of XPS over the footings. Therefore, we had to cut out the 4″ XPS, and cut other, 2″ thick, XPS to fit. No two footings were exactly the same size so that took awhile.  But we did it!

The next step was to cover the floor with a heavy gauge polyethylene, which happened to be bright yellow. We had to cut and fit that stuff for every footing, too, and stick it to the walls with an incredibly sticky double-sided tape! Plus it was an especially sunny day…

Yellow polyethylene...
Yellow polyethylene…

This was Monday, July 6. The floor was scheduled to be poured on Tuesday morning, and we were running behind. However, one of the concrete team arrived early afternoon to let us know that the pour had to be postponed until Thursday (due to other jobs and weather), which in the end was kind of a relief. He also brought re-bar, which we had said we could put together if needed. This gave us some time.  We mostly finished taping etc., plus preparing a strip of 4″ XPS to go around the perimeter of the basement on top of the polyethylene (a base for future insulation of the inside basement walls). It also rained a lot Monday night to Tuesday morning, so we caught up on grocery shopping etc. on Tuesday.

By this time, we also learned that the engineer recommended grids of re-bar for each of the footings, grids to be 3″ or 4″ squares, 3/4″ from the top of the XPS over each footing.  Yikes!  Tim and I got to work!

Tim cutting re-bar. Turns out, you only have to cut it half way through, then even I could break it across my knee!
Tim cutting re-bar. Turns out, you only have to cut it half way through; then even I could break it across my knee!

We worked out a system to lay out those 3″ and 4″ grids (22 an 16 pieces of re-bar each, respectively), and then wire every other intersection together. We had wires with a loop in each end, and a hook tool that made it easy to twist up the wire tightly.

Tim holding one of our grids.

The nine grids took us almost all day, and then we had to finish several places with the polyethylene. We also had to lay out and wire the big grid for the whole floor, and we began that around 7pm. That re-bar had to sit up on “chairs” to keep it raised up off the polyethylene, and all had to be wired together, etc.  We didn’t finish till 8:30 pm…

Here you can see how the re-bar was arranged. We had also used the very sticky double sided tape to attach the perimeter pieces of XPS to the polyethylene to keep it from floating when the concrete was poured.
Here you can see how the re-bar was arranged, and the little racks called “chairs” that keep it off the floor. We had also used the very sticky double sided tape to attach the perimeter pieces of XPS to the polyethylene to keep it from floating or lifting up when the concrete was poured.

We were on site Thursday morning by 7AM, along with everyone else, ready for the concrete trucks to arrive by 7:30!

Beginning the pour!
Beginning the pour!
Spreading it out...
Spreading it out…
Almost done with initial smoothing.
The mechanical
The mechanical “trowel”. The surface was smoothed with this machine several times during the first few hours.

The result was a beautiful, smooth floor! It truly looked beautiful to us! We were happy that our hard work paid off, none of the XPS “floated” and all the re-bar grids stayed in place.

Amid all the work on the floor, we also got electrical power to our site, which will be very helpful. A load of lumber for the first floor deck arrived. And a wonderful machine called a “telehandler” arrived on site. More about that in the next post.

Oh yes, the Fourth of July happened!  We worked most of the day, and then enjoyed the traditional local volunteer fire department’s chicken Bar-B-Q dinner, with all home made pie for dessert!

Meanwhile, we continued to enjoy the birds and the wild flowers.  There seem to be a lot of different birds, and they have been singing off and on all day!  One we like particularly is the winter wren, whose song is 8 to 10 seconds long, and it (or they?) sing off and on throughout the day.  This website: http://www.birdwatchersdigest.com/bwdsite/learn/identification/wrens/winter-wren.php includes a brief description and a recording of the song. This bird is why we named our place “Wren Wood”.

During this time, we started seeing more Black Eyed Susans, as well as the first Queens Anne’s Lace flowers.  We also have purple flowering raspberry, and some milkweed!

Purple Flowering Raspberry

Update

I can’t believe two weeks have flown by!  Tim and I are doing very well, and we have been working long days (good weather, so make hay while the sun shines, as the saying goes). The result is I am behind on this blog.  I hope to put up a lengthy post with lots of pictures in the next few days, with exciting progress!

In the meantime, it is day lily season here in Vermont. They grow tall, with LOTS of blossoms!  We have a couple blooming near the house site…

Our day lilies!
Our day lilies!

Progress!

Despite some delays for rain (record breaking month for rain in VT), we worked hard and got a lot done during the last week. Yay!

I mentioned at the end of the last post that one of the next tasks was to chip out concrete around each of the form tie wires, and patch with hydraulic cement. This was a job Tim and I did.  We had to mix the cement in small batches, because you only have about 2 minutes to work with it; you just take some in your gloved hand and as quickly as possible press it into the small depression. And we had to keep the chipped out areas damp AND dampen the patches several times during the curing. After we had put on the patches, we painted each patch twice with Xypex, the material that had been added to the foundation concrete to make it waterproof. The Xypex makes crystals when it gets wet, so if your concrete gets a crack some time, as soon as any moisture gets in crystals will form and fill the crack.

Here you can see the patches on one of the walls.
Here you can see the patches on one of the walls.  We only clipped form ties and patched the lower ones; the upper ones will be much easier to reach once back-filling has been done, plus most won’t need to be chipped and patched as they will be above grade.

The next tasks involved the Roxul boards, 4×6 foot panels of spun rock (kind of like fiber glass). These feel kind of like thick stiff felt; they provide some insulation but in particular they let any water drain down through the Roxul panels instead of having water pressure against the concrete. First we had to move them from the pallets up near the lumber down to the site.

The blue drain pipes filled up the truck to the top of the wheel wells, where the truck bed was wide enough for the Roxul panels.
The blue drain pipes, which had to be brought down to the building site anyway, filled up the truck to the top of the wheel wells, where the truck bed was wide enough for the Roxul panels.
Tim, standing next to one of our stacks.

On Thursday we started to attach the Roxul panels to the foundation walls. We had our challenges figuring out how to make the adhesive work!  After several trials and errors, and time ticking away, we found that using more and bigger globs of adhesive, and using boards to prop the panels, worked OK.  And we had to put up 2 layers to get the 4 inches needed…

Tim ready for me to hand down a Roxul board. We wore long sleeves, and he wore a mask, because the Roxul boards gave off little irritating fibers...
Tim has applied adhesive, and is ready for me to hand down the next Roxul board. We wore long sleeves, and he wore a mask, because the Roxul boards gave off little irritating fibers…
Boards propping up the Roxul panels until the adhesive dried enough.

In between everything else, Green Mountain Power came and  connected up our power, and the electrician came later and installed the temporary power box on the back of the camp. Now we can use power tools on site!!

Power connected!!
Power connected!!

Next task for Tim and me was to install the drainage pipes around the footings. This involved shoveling out muck that had washed down (did I mention we’ve had a lot of rain!), adding some gravel to make sure the drainage pipe would slope appropriately, cutting landscape fabric and placing it under the pipes (this prevents silt from getting into the pipes, which have holes along the bottom side), and fitting and attaching the pipe fittings as needed. Tim did the hard work “in the hole”, but I measured and cut the landscape fabric, did a lot of go-fering, and carried gravel (I could carry 2 half-full 5-gallon buckets at a time — thank you to Bonnie, my intrepid trainer I have worked with the last few years in GA!).

Tim shoveling out muck.
Landscape fabric under drainage pipe. This is the southeast corner, the highest point for the drainage system; the two openings are for tall vertical pipes that can be used for cleaning any stoppages.
Tim "in the hole" with Eric the excavator delicately adding gravel.
Tim “in the hole” with Eric the excavator delicately adding gravel around the pipes. The landscape fabric then gets folded over the top.

The next step was beginning to back fill with sand. This was done where the earth wall was tallest, especially because a lot of rain was expected soon and we did not want the clay-earth to fall in; sand is much better for drainage and firmness.

The first back-filling!

Also, Eric added a lot of gravel to the inside of the basement.  Where the walk-out is, the frost walls were much lower than the footings for the rest of the basement, so there were 3 “pads” for posts which could not be poured until this area was filled in with gravel.  Tim and I helped smooth it out the gravel, and Tim used the compactor while I helped to direct Eric where to put the gravel.  Since I really did not want to walk the “gangplank” over the deep ditch outside to get inside the basement, Eric had me sit in the excavator scoop and gave me a ride! Unfortunately, no one had the camera handy…

I am standing on about 4 feet of newly placed gravel! You can see the "gang plank" at the left of the opening, and the lawn-mower thing is the compactor.
I am standing on about 5 feet of newly placed gravel! You can see the “gang plank” at the left of the opening, and the lawn-mower-looking thing is the compactor.  It was an incredible amount of very heavy gravel!

The next day (Saturday) we came back and Tim finished connecting the drain pipes on the west wall, and we finished adding Roxul board for this stage of things.

Tim with the pipes perfectly connected to the drain (the diagonal pipe at the lower left, that had already been buried...
Tim at the northwest corner with the pipes perfectly connected to the drain (the diagonal pipe at the lower left) that had already been buried…  We were very happy!

That night we had around 1 1/2 inches of rain, and the drainage system worked perfectly when we looked at it the next day!

On Monday Eric did a lot more back-filling and added more gravel to the inside of the basement.

Here is the foundation/basement from the north west corner as of Monday afternoon!

Yesterday Norm and his crew constructed the forms for those last 3 “pads” in the basement, plus the footings for the slab on grade on the south side of the house. That concrete should be poured tomorrow afternoon.  The weather has played havoc with everyone’s schedules…

So, we were pretty tired out after last week, and are enjoying a couple of days where there is little we can do at the house site so we can chill out a bit before the next round of labor.

For the latest on flowers…  We are seeing lots of daisies, purple clover, and the first black-eyed Susan’s along the roadsides.  And near our camp we found a flower we have never seen before:

One-flowered cancer-root, or Orobanche uniflora, of the broomrape family.
The unfortunately named “One-flowered cancer-root,” or Orobanche uniflora, of the broomrape family. This plant has no leaves, no chlorophyll, and is parasitic on a wide range of plants. The tallest stem was only about 3-4″ tall.

Until next time…  :~)